Task X.C: Turns Around a Point
Lesson Overview
- Objective
-
The student should exhibit knowledge regarding the performance of a turn around a point. Knowledge will include the elements listed below. Performance of the maneuver should be to ACS/PTS standards.
- Reference
-
-
Aircraft Flight Manual / Pilot’s Operating Handbook
-
Airplane Flying Handbook (FAA-H-8083-3B, page(s) )
-
- Key Elements
-
-
Increased Airspeed = Increased Bank
-
Decreased Airspeed = Decreased Bank
-
Coordination
-
- Elements
-
-
Purpose of Turns Around a Point
-
Selecting a Suitable Altitude
-
Selecting a Suitable Reference Point
-
Prior to Entry
-
Entry Procedure
-
Wind Drift Correction
-
Exit
-
Division of Attention
-
Recap
-
- Equipment
-
-
White board and markers
-
References
-
iPad
-
- Instructor Actions
-
-
Discuss lesson objectives
-
Present Lecture
-
Ask and Answer Questions
-
Assign homework
-
- Student Actions
-
-
Participate in discussion
-
Take notes
-
Ask and respond to questions
-
- Schedule
-
-
Discuss Objectives
-
Review material
-
Development
-
Conclusion
-
- Completion Standards
-
The lesson is complete when the student can demonstrate the knowledge of, and has shown proficiency in turns around a point. The student understands the effect of wind on an aircraft’s course over the ground primarily during a turn.
Instructor Notes
Introduction
- Attention
-
This exercise shows the difference between the aircraft’s motion in the air, and its ground track. These are different because the aircraft is subject to the moving air mass in which it flies. If wind exists, a ground track with constant radius will require a constantly changing bank angle to correct for wind.
- Overview
-
-
Review Objectives and Elements/Key ideas
-
- Why
-
Turns around a point, the airplane is flown in two or more complete circles of uniform radii or distance from a prominent ground reference point using a maximum bank of approximately 45° while maintaining a constant altitude.
- Why
-
To develop division of attention between the flight path and ground references, to develop recognition of drift towards or away from a prominent ground reference point all while maintaining a constant altitude. This maneuver helps to further perfect the turning technique and the ability to correct for wind drift in turns.
Lesson Details
The turns about a point maneuver helps develop the ability to divide attention between the flight path and the ground references, develop the recognition of drift towards/away to/from a ground reference while maintain altitude, and further predict the turning technique and the ability to correct for wind drift in turns. All of these abilities are useful throughout the flying career, and when practiced enough these techniques become second nature. Once mastered this encourages further development in more advanced maneuvers and safe, competent, flying.
Before Starting
-
First select a starting altitude
-
Entry altitudes should be between 600 feet and 1,000 feet AGL as per the ACS, with the altitude held within ±100 feet. At 600 feet there is no room for error below, and at 1,000 feet there is no room for error above. Thus 800 feet would be a good altitude to select.
-
-
Select a suitable reference line
-
A straight ground reference should be selected, and could be a (straight) road, fence, railroad tracks, or a section line that is easily identifiable. The line must be sufficiently long to make a series of turns. Select a location clear of populations or hazards, and a location which would provide a landing area in case of an emergency during the maneuver.
-
-
Estimate wind direction using information from METARs, smoke, water, or a 360° turn noting ground track.
-
Training Aircraft might have Avionics such as the Aspen PFD that displays calculated wind direction.
-
-
Perform the pre-maneuver checklist
-
Fuel Pump - ON
-
Mixture - RICH
-
Gauges - GREEN
-
-
Ensure that the area is clear of traffic
-
Flaps and gear (if retractable) should be in the UP position.
-
The aircraft should be in straight-and-level flight at about 95 knots (but not above Va).
Entry
-
Position the aircraft to enter on the downwind side of the turn approximately 1/4 to 1/2 mile from the reference point.
-
Note the entry heading, used throughout the maneuver to maintain orientation and help in planning
Wind Drift Correction
-
Once abeam the point initiate a coordinated roll in, maintaining the 1/4 mile reference with a steep bank angle (≤ 45°).
-
The initial steep bank is necessary due to the tailwind and the highest groundspeed. The faster the groundspeed the steeper the bank angle needed to maintain the desired radius.
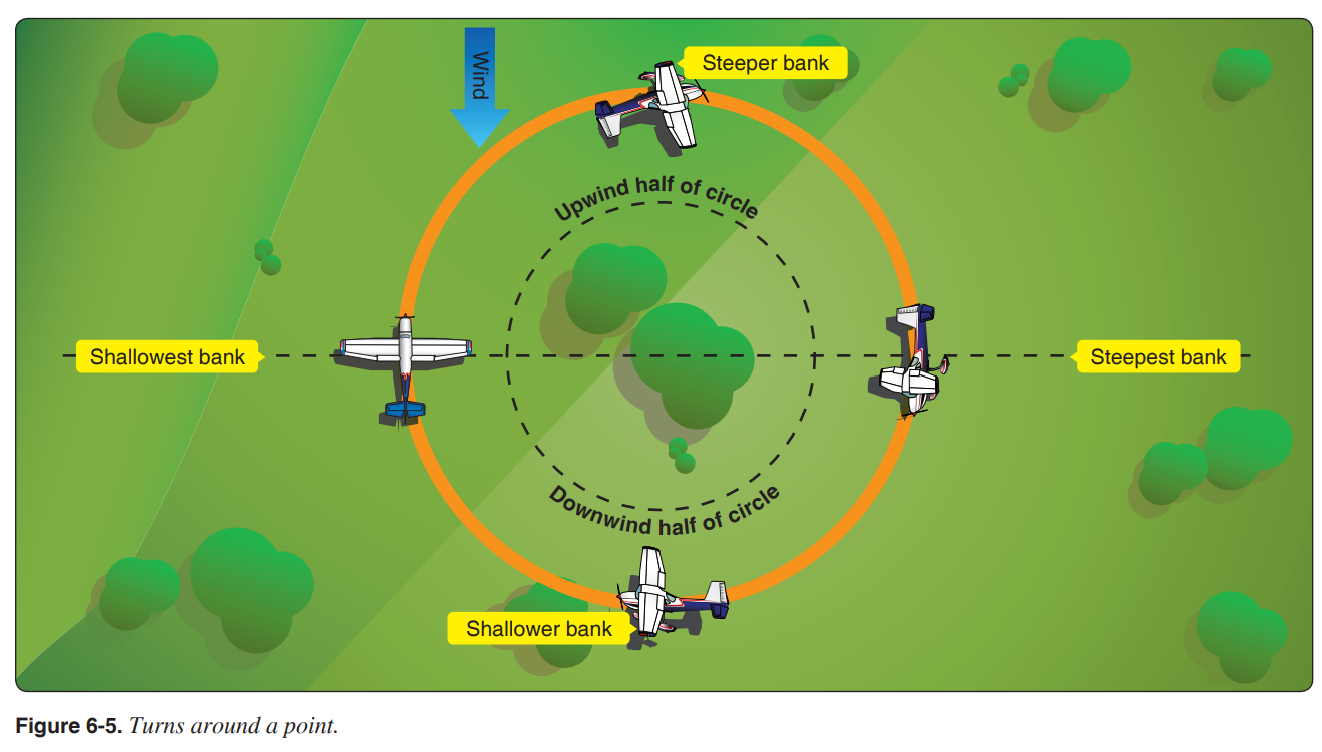
First Half of Turn (Downwind)
-
Start with the steepest bank, and ends with the shallowest bank
-
As the turn progresses the aircraft transitions from a tailwind to a headwind
-
The bank angle should be gradually reduced in order to maintain the constant turning radius. As bank angle is reduced less back pressure is needed to maintain altitude.
-
-
Keep the turn coordinated
-
As the bank angle is reduced rudder pressure will need to be reduced.
-
-
Progressively point the nose into the wind (i.e. crab) to maintain a constant ground track.
-
Downwind - The nose is turned toward the inside. As the turn progresses the wind pushes the aircraft outside the circle requiring a crab to maintain the arc.
-
-
At the end of the first 1/2 of the turn the bank should be at its most shallow point and the crab should be entirely removed (i.e. this is a direct headwind thus the lowest groundspeed with no crab required).
Second Half of Turn (Upwind)
-
This is the opposite of the first half - slowly move from shallow bank to steep bank
-
As the turn progresses the aircraft transitions from a headwind to a tailwind
-
The bank angle should be gradually increased in order to maintain the constant turning radius. As bank angle is increased more back pressure is needed to maintain altitude.
-
-
Keep the turn coordinated
-
As the bank angle is increased rudder pressure will need to be increased.
-
-
Progressively point the nose into the wind (i.e. crab) to maintain a constant ground track.
-
Upwind - The nose is turned toward the outside. As the turn progresses the wind pushes the aircraft inside the circle requiring a crab to maintain the arc.
-
-
At the end of the second 1/2 of the turn the bank should be at its most steep point and the crab should be entirely removed (i.e. this is a direct tailwind thus the highest groundspeed with no crab required).
Exiting the Maneuver
-
Complete at least two turns, then initiate a smooth rollout on the initial entry heading.
Division of Attention
This maneuver requires dividing the attention between outside references to maintain spacing from the reference point, and inside to verify that altitude, airspeed, bank angle, and coordination are being maintained. Additionally there is a need to scan for traffic.
Recap
The stronger the wind the more bank angle will have to be varied throughout the maneuver. However, the maximum bank angle should be no more than 45° at the steepest point. Theoretically if there was no wind the bank angle would never vary, and there would be no need for a crab. As the bank angle gets steeper, more back pressure will be required to maintain altitude.
It can be helpful to pick out some visual reference targets along the flight path. This can be a barn, building, lake, etc. usually at 1/4 intervals along the circle. These reference points can help maintain orientation and ensures that the aircraft is at the right place at the right time.
|
⚠️
|
Common Errors
|
Conclusion
This maneuver works to establish a better understanding of the airplane’s turning tendencies due to changing crosswinds while helping the pilot learn to divide attention between controlling the airplane and other traffic.
ACS Requirements
CFI PTS Standards
- To determine that the applicant
-
-
Exhibits instructional knowledge of the elements of turns around a point by describing:
-
The purpose of turns around a point and their relationship to basic/advanced airmanship skills.
-
How to select a suitable altitude.
-
How to select a suitable ground reference point with consideration given to emergency landing areas.
-
Orientation, division of attention, and planning.
-
Configuration and airspeed prior to entry.
-
Entry procedure.
-
Wind drifts correction.
-
How to maintain desired altitude, airspeed, and distance from reference point.
-
Coordination of flight controls.
-
-
Exhibits instructional knowledge of common errors related to turns around a point by describing:
-
Faulty entry procedure.
-
Poor planning, orientation, or division of attention.
-
Uncoordinated use of flight controls.
-
Improper correction for wind drift.
-
Failure to maintain selected altitude or airspeed.
-
Selection of a ground reference point where there is no suitable emergency landing area within gliding distance.
-
-
Demonstrates and simultaneously explains turns around a point from an instructional standpoint.
-
Analyzes and corrects simulated common errors related to turns around a point.
-
Private Pilot ACS Skills Standards
-
Clear the area.
-
Select a suitable ground reference area, line, or point as appropriate.
-
Plan the maneuver:
-
Turns around a point: enter at an appropriate distance from the reference point, 600 to 1,000 feet AGL at an appropriate distance from the selected reference area
-
Apply adequate wind drift correction during straight and turning flight to maintain a constant ground track around a rectangular reference area, or to maintain a constant radius turn on each side of a selected reference line or point.
-
Complete turns in either direction, as specified by the evaluator.
-
Divide attention between airplane control, traffic avoidance and the ground track while maintaining coordinated flight.
-
Maintain altitude ±100 feet; maintain airspeed ±10 knots.