Task VIII.D: Straight Descents and Descending Turns
Lesson Overview
- Objective
-
The student should develop knowledge of the elements related to straight and turning descents and have the ability to maintain a constant airspeed descent in both situations.
- Reference
-
-
Aircraft Flight Manual / Pilot’s Operating Handbook
-
Airplane Flying Handbook (FAA-H-8083-3) Chapter 3-19
-
- Key Elements
-
-
Decreased Drag
-
Coordination
-
Crosschecking
-
- Elements
-
-
Flight Controls
-
Forces in the Descent
-
Types of Descents
-
Control Pressures and Overcontrolling
-
Trim Technique
-
Integrated Flight Instruction
-
Straight Descents
-
Turning Descents
-
- Equipment
-
-
White board and markers
-
References
-
iPad
-
- Instructor Actions
-
-
Discuss lesson objectives
-
Present Lecture
-
Ask and Answer Questions
-
Assign homework
-
- Student Actions
-
-
Participate in discussion
-
Take notes
-
Ask and respond to questions
-
- Schedule
-
-
Discuss Objectives
-
Review material
-
Development
-
Conclusion
-
- Completion Standards
-
The student understands the factors related to descents and can properly perform a descent while in straight or turning flight.
Instructor Notes
Introduction
- Attention
-
Straight and turning descents are the final chapter of the fundamentals of flying. This along, with the other fundamentals, is what everything else in flying builds upon. Getting these maneuvers right will improve all future maneuvers.
- Overview
-
Review Objectives and Elements/Key ideas
- What
-
A descent is made when the aircraft is put in a configuration which will result in a loss of altitude.
- Why
-
Descents are a fundamental part of flight, understanding and being properly performing a descent will result in everything else being considerably easier.
Lesson Details
The first thing to understand are the controls which are involved in straight descents and descending turns. As is the case with virtually all basic maneuvers all of the primary flight controls are involved, and there is rotation around the three axis (pitch, roll, and yaw).
Pitch is controlled by the elevators, and forward and back pressure on the elevator control is what causes pitch changes. Back pressure deflects the trailing edge of the elevator up decreasing the camber of the horizontal control surface thus creating a downward force. Forward pressure does exactly the opposite.
Roll is controlled by the ailerons, and right/left pressure on the aileron control is what causes roll changes. When the right aileron deflects up the decreasing camber results in decreased lift on the right wing, and the left aileron deflecting down increases the camber resulting in increased lift. This causes a roll to the right. Moving the aileron control to the left does exactly the opposite.
Yaw is controlled by the rudder. When the rudder is deflected into the airflow a horizontal force is exerted in the opposite direction.
Flight Controls
All four primary controls are used in coordination when making climbs and climbing turns
-
Ailerons - Bank the wings and determine the rate of turn at a given airspeed
-
Elevator - Moves the nose up or down in relation to the pilot, and perpendicular to the wings
-
It sets the pitch attitude in the turn and “pulls” the nose around the turn
-
-
Rudder - Offsets yaw effects developed by the other controls (is not used to turn the airplane)
-
Throttle - Provides thrust which may be used to maintain airspeed during a turn
Forces in the Descent
In a descent, weight no longer acts perpendicular to the flightpath (light blue line in the picture)
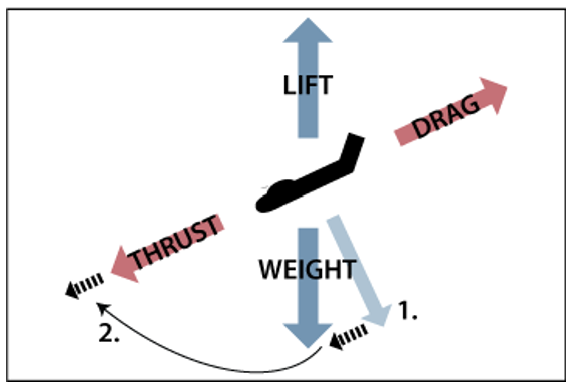
In a descent, weight no longer acts perpendicular to the flightpath (light blue line in the picture).
-
It acts in a forward direction (pointing toward the center of the earth — #1 In the picture)
-
This effectively adds to thrust (#2 in the picture) which means a decrease in thrust (or increase in drag) is required to maintain the current airspeed in the descent
-
Ignoring drag devices in this situation, airspeed will increase if thrust is not decreased when entering a descent
-
-
In a normal, steady state descent the wing’s lift is basically the same as it is in level flight at the same airspeed.
Although the flight path changed when the descent was established, the angle of attack of the wing with respect to the declined flight path reverts to practically the same values, as does lift
During the change from straight-and-level to a descent, a change in lift occurs when elevator is first applied
-
Lowering the airplane’s nose decreases the angle of attack and momentarily decreases lift
-
Lift at this moment is less than weight and the airplane starts descending
Once the flight path is stabilized, the angle of attack and lift revert to approximately level flight values. If the descent is entered with no change in power settings, the airspeed gradually increases.
-
This is because the forward component of weight effectively adds to thrust
-
When declined, a component of weight acts in the same direction as, and parallel to thrust (#1 in the picture above)
Since in a descent, weight is not only acting downward, but also forward with thrust, less power is needed to maintain the same airspeed as in level flight.
Types of Descents
Partial Power Descent
-
The normal method of losing altitude is to descend with partial power
-
The airspeed and power setting recommended by the manufacturer should be used
-
-
The target descent rate should be 500 fpm (this will vary based on aircraft)
-
The desired airspeed, pitch attitude, and power combination should be preselected and kept constant
Descent at Minimum Safe Airspeed
-
A nose-high, power assisted descent primarily used for clearing obstacles during a short field approach
-
Airspeed is usually recommended by the manufacturer and is normally no greater than 1.3 VSO
-
-
Characteristics
-
Steeper than normal descent angle
-
Excessive power may be necessary to accelerate from the low airspeed should an excessive descent develop
-
Emergency Descent
-
Some airplanes have a specific procedure for rapidly losing altitude in the POH
-
In general, emergency descents are high drag, high airspeed procedures requiring a specific configuration and speed, and often involve turns (increase the descent and allow for clearing below the airplane)
Glide
-
A basic maneuver in which the airplane loses altitude in a controlled descent with little or no power
-
The descent rate is controlled by balancing the forces of gravity and lift
-
🔥 Common Error - Failure to clear engine and use carburetor heat, as appropriate
Clear the engine when operating in a power off condition for an extended period of time
Control Pressures and Over-Controlling
It is important to maintain a light grip on the flight controls
-
Only grip with the fingertips
The control forces desired should be exerted lightly and just enough to produce the desired result
|
⚠️
|
|
Overcoming Tenseness/Over-controlling
It can be easy to over-control the aircraft especially if having a death grip.Obviously, this is mitigated by maintaining a light grip on the flight controls. Try to only grip with the fingertips. This helps to exert only the control pressure needed which should be just enough to produce the desired result.
-
Signs of over-controlling
-
Control movements rather than control pressures
-
Jolty, large movements of the flight controls
-
White knuckles (look for the death grip)
-
Overall nervousness
-
-
Prevention
-
Point out the over-controlling and demonstrate the correct light, fingertip grip and the pressures desired.
-
-
Trim Technique
Most airplanes are designed so that the primary flight controls (rudder, aileron, elevator) are streamlined with the non-movable airplane surfaces when the airplane is cruising straight and level at normal weight and loading.
-
If the airplane is out of that balanced condition (faster, slower, heavier, lighter, etc.), one or more of the control surfaces is going to have to be held out of its streamlined position by continuous control input.
-
Trim tabs/control surfaces offset the constant flight control pressure inputs needed from the pilot
-
A properly trimmed aircraft is an indication of good piloting skills, and should allow the pilot to fly almost hands free
-
Any control forces the pilot feels should be a result of deliberate flight control inputs, not forces being applied by the airplane
-
-
Trimming the Airplane
-
Set the power
-
Set the pitch
-
Let the airspeed stabilize
-
Trim the airplane for the current airspeed
-
Establish and hold the airplane in the desired attitude using the primary flight controls
-
Proper attitude should be established with reference to the horizon and then verified by reference to the flight instruments
-
-
Apply trim to relieve the control pressure
-
The airplane attitude must be established and held first, then control pressures trimmed
-
-
As previously discussed, if power changes, the pitch attitude to maintain level flight will change, and the aircraft will have to be re-trimmed
-
On a longer flight, as the CG changes with decreasing fuel, small adjustments may have to be made to maintain the proper trim
-
-
💥🔥Common Error - Faulty trim technique💥🔥
Trying to fly the airplane with trim is a common fault There is no such thing as the perfect trim — with changing air, gusts, turbulence, fuel burn, etc. the airplane will have to be trimmed often
Integrated Flight Instruction
Each flight maneuver is first learned by reference to outside references, then by instrument references only. This integrated approach will help develop the habit of monitoring the flight and engine instrumentation.
Straight Descents
Entering the Straight Descent
1 - Slow to descent speed
-
Gently decrease the power to the desired setting
-
Maintain altitude until reaching the descent airspeed
-
As power is reduced, the nose of the airplane will have a tendency to fall
-
In many airplanes, as power is decreased, a decrease in the slipstream over the horizontal stabilizer will cause the nose to fall (reduces the tail down force, lowering the nose)
-
-
Gently increase back pressure to maintain the current altitude and allow the airspeed to decrease toward the descent airspeed
-
The lower the power setting, the faster the airspeed will decrease — a smooth, controlled reduction in power allows the pilot to maintain altitude far easier than a fast, large decrease in power
-
2 - Establish the Descent
-
Establish the descent
-
Just prior to reaching the descent airspeed, relax the back pressure to lower the nose to the approximate pitch attitude on the horizon for the descent
-
-
Crosscheck the instruments
-
If the airspeed is fast or slow, make a correction in relation to the natural horizon, let the airplane stabilize, and crosscheck again
-
3 - Trim the airplane
-
Once stabilized in the descent at the desired speed, trim the airplane to relieve the control pressures
-
🔥 Common Error - Faulty trim procedure
4 - Maintaining the Descent
Throughout the descent, since the power is fixed, airspeed is controlled by pitch (with elevator pressure)
-
If the airspeed is too fast, raise the nose in relation to the horizon, let the airspeed stabilize, and retrim the airplane
-
If the aircraft is too slow, lower the nose in relation to the horizon, let the airspeed stabilize, and retrim the airplane
-
The amount of elevator pressure/pitch change will depend on the required change in speed — larger speed changes require larger movements
-
Once back on airspeed, trim the airplane to relieve the control pressures
-
Common Error - Application of control movements rather than pressures
-
Use very small corrections for minor changes in airspeed. Give the airplane time to react to the pitch change, and then make another correction, if required
-
⚠️ Keep the wings level to maintain the straight descent
⚠️ Maintain Coordination
⚠️ Crosscheck for the desired results on the instruments
5 - Returning to Straight-and-Level flight
-
Because of the aircraft’s downward inertia, the level off must be started before reaching the desired altitude
-
At the lead point, smoothly increase power to the cruise power setting, and begin to slowly raise the nose in relation to the horizon while maintaining wings level
-
Adding power at the lead point, rather than when leveled off, will allow for a smooth acceleration back to cruise speed
-
The airplane’s nose tends to rise as airspeed and power increase
-
Use smooth, slow and controlled control pressures to simultaneously reach the level flight pitch attitude at the desired level off altitude
-
-
Establish the level flight site picture at the desired altitude, and allow the aircraft to continue to accelerate to cruise speed
-
Establish the level flight site picture at the desired altitude, and allow the aircraft to continue to accelerate to cruise speed
Turning Descents
1 - Entering the Turning Descent
Descending turns can be established one of two ways:
-
Enter the descent first and then bank into the turn
-
Enter the descent and turn simultaneously
-
Establish the desired bank angle with reference to the horizon and attitude indicator
-
The procedure
-
Very similar to the straight descent
-
Reduce the power and maintain altitude
-
Just prior to reaching the descent airspeed, enter the turning descent in one of the two ways
-
Lower the nose to establish the descent airspeed, and then roll into the desired bank
-
Lower the nose to establish the descent airspeed while rolling into the desired bank
-
-
Once at the desired airspeed and bank, note the nose and wings in relation to the horizon and the position on the attitude indicator
2 - Maintaining the Turning Descent
-
Pitch adjustments are made in the same way as in a straight descent
-
Bank Adjustments
-
Increase or decrease the bank as necessary to maintain the desired bank angle
-
Adjusting bank can have an effect on the airspeed and pitch may need to be readjusted
-
⚠️ Common Error - Application of control movements rather than pressures
-
As discussed, use smooth, controlled pressures to adjust the pitch and bank
-
-
-
Maintain Coordination
-
Crosscheck for the desired results on the instruments
-
⚠️Common Error - Failure to cross-check and correctly interpret outside and instrument references
-
3 - Returning to Straight-and-Level Flight
-
Very similar to the straight descent, except with the addition of rolling the wings level
-
Lead the level off by 10% of the descent rate
-
At the lead point, smoothly increase power to the cruise power setting, and begin to slowly raise the nose and level the wings
-
Ensure attention is divide between pitch, bank, and coordination
-
-
Attempt to level the nose and the wings simultaneously at the level off altitude
-
Initially, it may be easier to break the return to straight-and-level flight into two pieces — raising the nose, then rolling out the bank. Work to manage pitch and bank simultaneously
-
Adjust rudder pressure to maintain coordination as power is increased, and bank is rolled out
-
-
Once stabilized, trim the airplane for straight-and-level flight
💥🔥Common Errors - Descents💥🔥
-
Failure to cross-check and correctly interpret outside and instrument references
-
Application of control movements rather than pressures
-
Uncoordinated use of the flight controls
-
Faulty trim technique
-
Failure to clear engine and use carburetor heat, as appropriate
Conclusion
-
Brief review of the main points
Descents are part of the foundation of flying and as simple as they sound, they are extremely important. As in all of the fundamentals of flight it is important to learn to fly the airplane by visual references and back those references up with the instrument indications.
ACS Requirements
CFI PTS
- To determine that the applicant
-
Exhibits instructional knowledge of the elements of straight descents and descending turns by describing:
-
Effect and use of flight controls.
-
The Integrated Flight Instruction method.
-
Outside and instrument references used for pitch, bank, yaw, and power control; the crosscheck and interpretation of those references; and the control procedure used.
-
Trim procedure.
-
Methods that can be used to overcome tenseness and over controlling.
-
-
Exhibits instructional knowledge of common errors related to straight descents and descending turns by describing:
-
Failure to cross-check and correctly interpret outside and instrument references.
-
Application of control movements rather than pressures.
-
Uncoordinated use of flight controls.
-
Faulty trim procedure.
-
Failure to clear engine and use carburetor heat, as appropriate.
-
-
Demonstrates and simultaneously explains straight descents and descending turns from an instructional standpoint.
-
Analyzes and corrects simulated common errors related to straight descents and descending turns.
-