Task VIII.C: Straight Climbs and Climbing Turns
Lesson Overview
- Objective
-
The student should develop knowledge of the elements related to straight and turning climbs. The student will demonstrate the ability to perform a constant airspeed climb during straight flight as well as in a turn. The student will learn the effects of climbs and be able to keep the airplane coordinated throughout.
- Reference
-
-
Airplane Flying Handbook (FAA-H-8083-3) Chapter 3-18
-
- Key Elements
-
-
Increased Thrust
-
Coordination
-
Crosschecking
-
- Elements
-
-
Flight Controls
-
Forces in the Climb
-
Types of Climbs
-
Control Pressures and Overcontrolling
-
Trim Technique
-
Integrated Flight Instruction
-
Straight Climb
-
Climbing Turn
-
- Equipment
-
-
White board and markers
-
References
-
iPad
-
- Instructor Actions
-
-
Discuss lesson objectives
-
Present Lecture
-
Ask and Answer Questions
-
Assign homework
-
- Student Actions
-
-
Participate in discussion
-
Take notes
-
Ask and respond to questions
-
- Schedule
-
-
Discuss Objectives
-
Review material
-
Development
-
Conclusion
-
- Completion Standards
-
The student has the ability to turn at varying degrees of bank, maintaining altitude and airspeed while crosschecking instruments.
Instructor Notes
Introduction
- Attention
-
Level turns sound boring and simple, but there is a lot more to turning than you might think, and a strong grasp on this will make many other maneuvers considerably easier.
- Overview
-
Review Objectives and Elements/Key ideas
- What
-
A level turn is a turn at a specified angle of bank in which altitude and airspeed are maintained.
- Why
-
The ability to understand and fly a level turn is essential to the building of every pilot’s skill set. Level turns are the building blocks to many more difficult maneuvers and will help the pilot in his or her control of the airplane.
Lesson Details
Flight Controls
Turning in level flight is one of the most basic actions taken in flight. It involves all primary flight controls to execute a coordinated level turn. Each is used as follows :
- Ailerons
-
Bank the wings and determine the rate of turn at a given airspeed
- Elevator
-
-
Moves the nose up or down in relation to the pilot, and perpendicular to the wings
-
It sets the pitch attitude in the turn and “pulls” the nose around the turn
-
-
- Rudder
-
Offsets yaw effects developed by the other controls (is not used to turn the airplane)
- Throttle
-
Provides thrust which may be used to maintain airspeed during a turn
Forces in the Climb
Forces of Flight
-
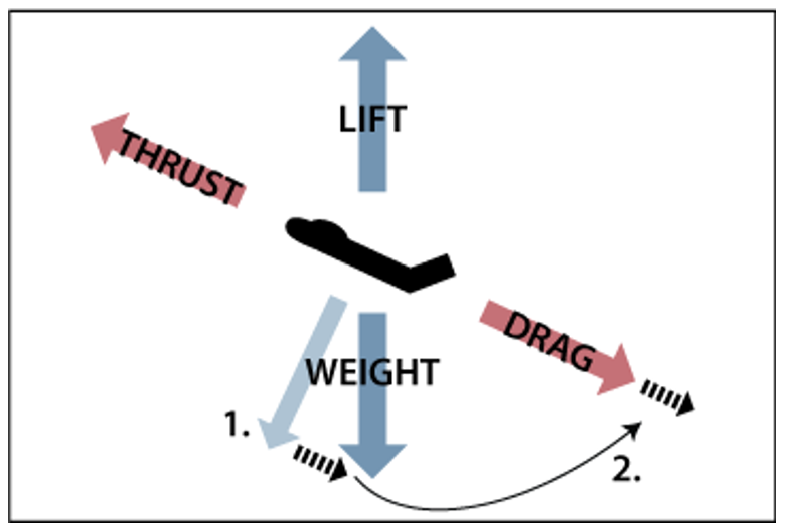
In a climb, weight no longer acts perpendicular to the flightpath
-
It acts in a rearward direction (pointing toward the center of the Earth)
-
This causes an increase in total drag requiring an increase in thrust to balance the forces
-
-
-
An airplane can only sustain a climb angle when there is sufficient thrust to offset increased drag
-
Therefore, climb is limited by the available thrust
-
In a normal, steady state climb the wing’s lift is basically the same as it is in level flight at the same airspeed
-
-
Although the flight path changed when the climb was established, the angle of attack of the wing with respect to the inclined flight path reverts to practically the same values, as does lift
-
During the change from straight and level to a climb, a change in lift occurs when elevator is first applied
-
Once the flight path is stabilized, the angle of attack and lift revert to approximately level flight values
-
If the climb is entered with no change in power settings, the airspeed gradually diminishes
-
-
This is because the thrust required to maintain an airspeed in level flight cannot maintain the airspeed in a climb
-
When inclined upward, a component of weight acts in the same direction as, and parallel to drag (1. In the picture above)
-
Since in a climb, weight is not only acting downward, but also rearward with drag, additional power is needed to maintain the same airspeed as in level flight (the amount of power depends on the angle of climb)
-
-
Therefore, the aircraft’s ability to climb is limited by available, or excess, thrust
-
When the excess thrust is gone, the aircraft is no longer able to climb, and the aircraft has reached its absolute ceiling
-
Propeller Effects
In a climb, propeller airspeed is significantly lower and the angle of attack is significantly greater than in cruise flight
-
Torque and asymmetrical loading of the propeller will cause the airplane to roll and yaw left
-
Right rudder pedal pressure is necessary to counteract this
-
Types of Climbs
The pilot should know the engine power settings, natural horizon pitch attitudes, and flight instrument indications that produce the following types of climbs:
Normal Climb (Cruise Climb)
-
Performed at an airspeed recommended by the airplane manufacturer
-
Usually faster than the best rate of climb, but provides better cooling, control, and visibility
-
-
88 KIAS in Piper Warrior
-
An Easy Rule-of-Thumb If You Don’t Have A Published Vcc
-
If you want to figure out the cruise climb speed for your airplane, and you don’t have a published speed, a good rule-of-thumb is to find the difference between Vx and Vy, and add that number to Vy.
-
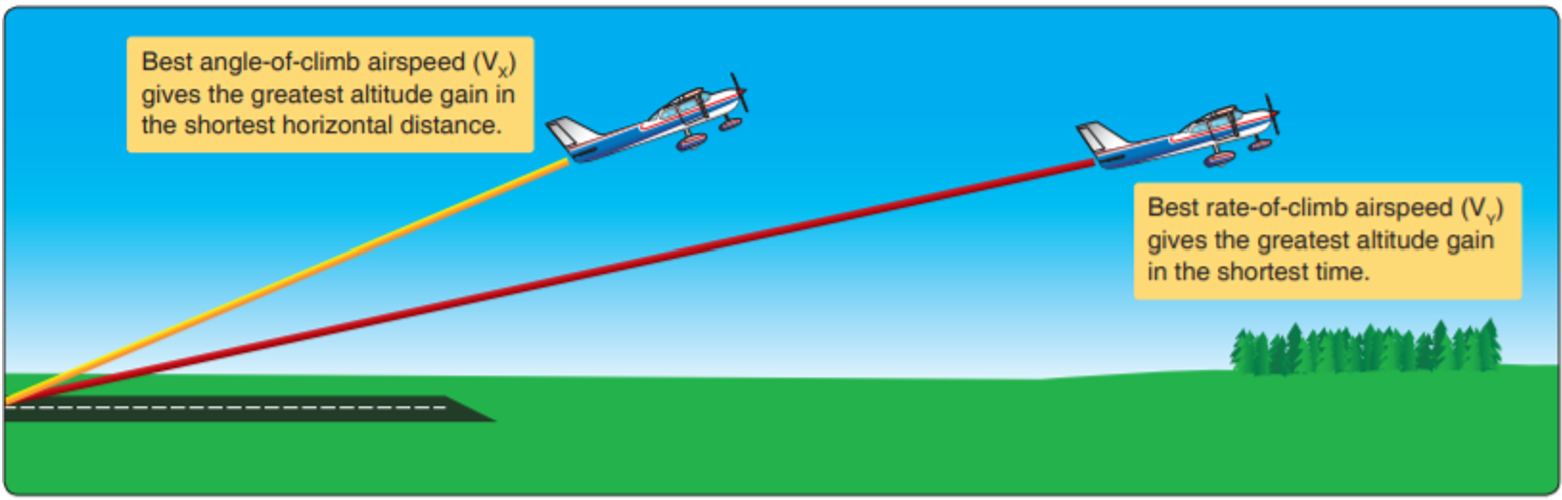
Best Rate of Climb (Vy)
Performed at an airspeed that produces the most altitude gain in the least time (Maximum feet per minute)
-
The airspeed where the most excess power is available over that required for level flight
-
Power is the energy the engine produces
-
As altitude increases, the airspeed for the best rate of climb decreases
-
-
The best rate of climb speed + maximum power = the aircraft’s maximum climb
-
Attempts to obtain more climb performance by increasing pitch will result in a decreased rate of climb
-
Best Angle of Climb (Vx)
-
Performed at an airspeed that will produce the most altitude gain in a given distance
-
Slower than Vx
-
The airspeed where the most excess thrust is available over that required for level flight
-
Vx will result in a steeper climb path, but will take longer to reach altitude than a climb at Vy
-
Therefore, Vx is used in clearing obstacles after takeoff
-
-
Control Pressures and Over-Controlling
It is important to maintain a light grip on the flight controls
-
Only grip with the fingertips
The control forces desired should be exerted lightly and just enough to produce the desired result
|
⚠️
|
💥🔥Common Error - Application of control movements rather than pressures |
-
Use smooth, light pressure, not jerky movements
-
Large, jerky movements lead to large changes in pitch, bank, airspeed, etc., which leads to the pilot chasing the desired attitude
-
Next time you drive, pay attention to the steering wheel corrections you use to maintain your lane on the freeway
-
The student should follow along with the instructor during the maneuver to feel the control pressures being used to maintain straight-and-level flight
Overcoming Tenseness/Over-controlling
It can be easy to over-control the aircraft especially if having a death grip.Obviously, this is mitigated by maintaining a light grip on the flight controls. Try to only grip with the fingertips. This helps to exert only the control pressure needed which should be just enough to produce the desired result.
-
Signs of over-controlling
-
Control movements rather than control pressures
-
Jolty, large movements of the flight controls
-
White knuckles (look for the death grip)
-
Overall nervousness
-
-
Prevention
-
Point out the over-controlling and demonstrate the correct light, fingertip grip and the pressures desired.
-
-
Trim Technique
Most airplanes are designed so that the primary flight controls (rudder, aileron, elevator) are streamlined with the non-movable airplane surfaces when the airplane is cruising straight and level at normal weight and loading.
-
If the airplane is out of that balanced condition (faster, slower, heavier, lighter, etc.), one or more of the control surfaces is going to have to be held out of its streamlined position by continuous control input.
-
Trim tabs/control surfaces offset the constant flight control pressure inputs needed from the pilot
-
A properly trimmed aircraft is an indication of good piloting skills, and should allow the pilot to fly almost hands free
-
Any control forces the pilot feels should be a result of deliberate flight control inputs, not forces being applied by the airplane
-
-
Trimming the Airplane
-
Set the power
-
Set the pitch
-
Let the airspeed stabilize
-
Trim the airplane for the current airspeed
-
Establish and hold the airplane in the desired attitude using the primary flight controls
-
Proper attitude should be established with reference to the horizon and then verified by reference to the flight instruments
-
-
Apply trim to relieve the control pressure
-
The airplane attitude must be established and held first, then control pressures trimmed
-
-
As previously discussed, if power changes, the pitch attitude to maintain level flight will change, and the aircraft will have to be re-trimmed
-
On a longer flight, as the CG changes with decreasing fuel, small adjustments may have to be made to maintain the proper trim
-
-
|
⚠️
|
|
Integrated Flight Instruction
Each flight maneuver is first learned by reference to outside references, then by instrument references only. This integrated approach will help develop the habit of monitoring the flight and engine instrumentation.
Straight Climb
Entering the Straight Climb
Gently increase back pressure to raise the nose to the proper position in relation to the horizon, while simultaneously increasing engine power to the climb power setting, then verify with the instruments
Maintaining the Straight Climb
Throughout the climb, since the power is fixed at the climb power setting, airspeed is controlled with elevator pressure
-
If the aircraft is too fast, raise the nose, let the airspeed stabilize, and retrim the airplane
-
If the aircraft is too slow, lower the nose, let the airspeed stabilize, and retrim the airplane
-
The amount of elevator pressure/pitch change will depend on the required change in speed — larger speed changes require larger movements
Keep the wings level to maintain the entry heading
-
Use the same procedures as discussed in Straight-and-Level flight to visually maintain a heading
-
Use the wings and nose of the airplane in relation to the horizon to maintain straight flight
-
You can also use two points directly in line with each other in front of the airplane
-
-
If off heading, use a bank angle equal to the degrees off to correct back
-
Ex: If the airplane drifted 10 degrees off heading, use a gentle 10 degrees bank angle to return to the original heading
-
Returning to Straight-and-Level Flight
-
Initiate the level off at approximately 10% of the rate of climb
-
The nose must be lowered smoothly and slowly to allow for the airspeed to increase
-
Gently lower the nose to the level flight pitch attitude on the horizon while maintaining wings level
-
Once established in level flight, the power should be left at the climb power setting temporarily to accelerate to cruise speed
-
The airplane should be re-trimmed for level flight
Climbing Turn
Factors to Consider in a Climbing Turn vs a Straight Climb
-
Additional back pressure will be necessary
-
With a constant power setting, the same pitch attitude and airspeed cannot be maintained in a climbing turn as in a straight climb due to the increase in the total lift required
-
Additional increased back pressure is necessary to compensate for the additional drag and reduction in the vertical component lift in the turn
-
-
Bank Angle
-
It is most effective to limit the turns to shallow bank angles
-
This provides for a more efficient rate of climb
-
In medium or steep banked turns climb performance is degrade, or possibly non-existent
-
At a constant power setting, the airplane will climb at a slightly shallower climb angle because some of the lift is being used to turn the airplane
-
The bank should always remain constant
-
-
-
Adverse Yaw
-
Adjust the rudder pressure to compensate for the left turning tendencies associated with the climb combined with the adverse yaw associated with the turn
-
All the factors that affect the airplane during level turns affect the airplane during climbing turns
-
The pilot must manage the inherent stability of the airplane, overbanking tendencies, adverse yaw, propeller effects, reduction of the vertical component of lift, and increased drag
💥🔥Climbing Turn - Common Errors💥🔥
-
Failure to cross-check and correctly interpret outside and instrument references
-
Application of control movements rather than pressures
-
Improper correction for torque effect
-
Faulty trim technique
Conclusion
-
Brief review of the main points
In a climb thrust must be increased because weight is acting backward relative to the flight path, resulting in an increase in drag. To maintain the proper pitch attitude the nose of the airplane must be held in the same place relative to the horizon, adjustments are made by crosschecking the attitude indicator as well as Altimeter and VSI. During a climbing turn, due to the decreased vertical component of lift, the climb rate will be lower than in a straight climb. It is very important to keep any climb coordinated through the use of rudder.
ACS Requirements
- To determine that the applicant
-
-
Exhibits instructional knowledge of the elements of level turns by describing:
-
Effect and use of flight controls.
-
The Integrated Flight Instruction method.
-
Outside and instrument references used for pitch, bank, yaw, and power control; the crosscheck and interpretation of those references; and the control procedure used.
-
Trim procedure.
-
Methods that can be used to overcome tenseness and over controlling.
-
-
Exhibits instructional knowledge of common errors related to level turns by describing:
-
Failure to cross-check and correctly interpret outside and instrument references.
-
Application of control movements rather than pressures.
-
Uncoordinated use of flight controls.
-
Faulty altitude and bank control.
-
-
Demonstrates and simultaneously explains level turns from an instructional standpoint.
-
Analyzes and corrects simulated common errors related to level turns.
-