Task X.D: Eights on Pylon
Lesson Overview
- Objective
-
The student should develop knowledge of the elements behind the Eights on Pylons maneuver and have the ability to perform the maneuver to ACS/PTS standards.
- Reference
-
-
Aircraft Flight Manual / Pilot’s Operating Handbook
-
Airplane Flying Handbook (FAA-H-8083-3B, page(s) 6-14)
-
- Key Elements
-
-
Points moves forward: Forward Pressure
-
Point moves backward: Backward Pressure
-
Small, coordinated corrections
-
- Elements
-
-
Pivotal Altitude
-
Before the Maneuver
-
Performing Eights on Pylons
-
- Equipment
-
-
White board and markers
-
References
-
iPad
-
- Instructor Actions
-
-
Discuss lesson objectives
-
Present Lecture
-
Ask and Answer Questions
-
Assign homework
-
- Student Actions
-
-
Participate in discussion
-
Take notes
-
Ask and respond to questions
-
- Schedule
-
-
Discuss Objectives
-
Review material
-
Development
-
Conclusion
-
- Completion Standards
-
The lesson is complete when the student understands Pivotal Altitude and the accompanying concepts to Eights on Pylons. The student also will have the ability to properly fly the maneuver.
Instructor Notes
Introduction
- Attention
-
The eights on pylons maneuver started in WWI. In order to have a constant view of a target and have the ability to destroy it, this maneuver was developed. It allowed aircraft to point the wing at a point and maintain the same sight picture, allowing the gunner to destroy a target. A more practical application, for us, would be keeping the wing out of the way for some sort of aerial photography.
- Overview
-
-
Review Objectives and Elements/Key ideas
-
- What
-
Eights on Pylons is an advanced maneuver in which the pilot’s attention is directed at maintaining a pivotal position on a selected pylon, with minimum attention inside the cockpit. The maneuver itself involves flying the airplane in a figure eight path around two selected points or pylons on the ground. However, no attempt is made to maintain a uniform distance from the pylon. Instead, the airplane is flown at such a precise altitude and airspeed that a line parallel to the airplane’s lateral axis, and extending from the pilot’s eye, appears to pivot on each of the pylons.
- Why
-
The objective of this maneuver is to develop the ability to maneuver the airplane accurately while dividing one’s attention between the flight path and the selected points on the ground. Eights on Pylons are extremely helpful in teaching, developing, and testing subconscious control of the airplane.
Lesson Details
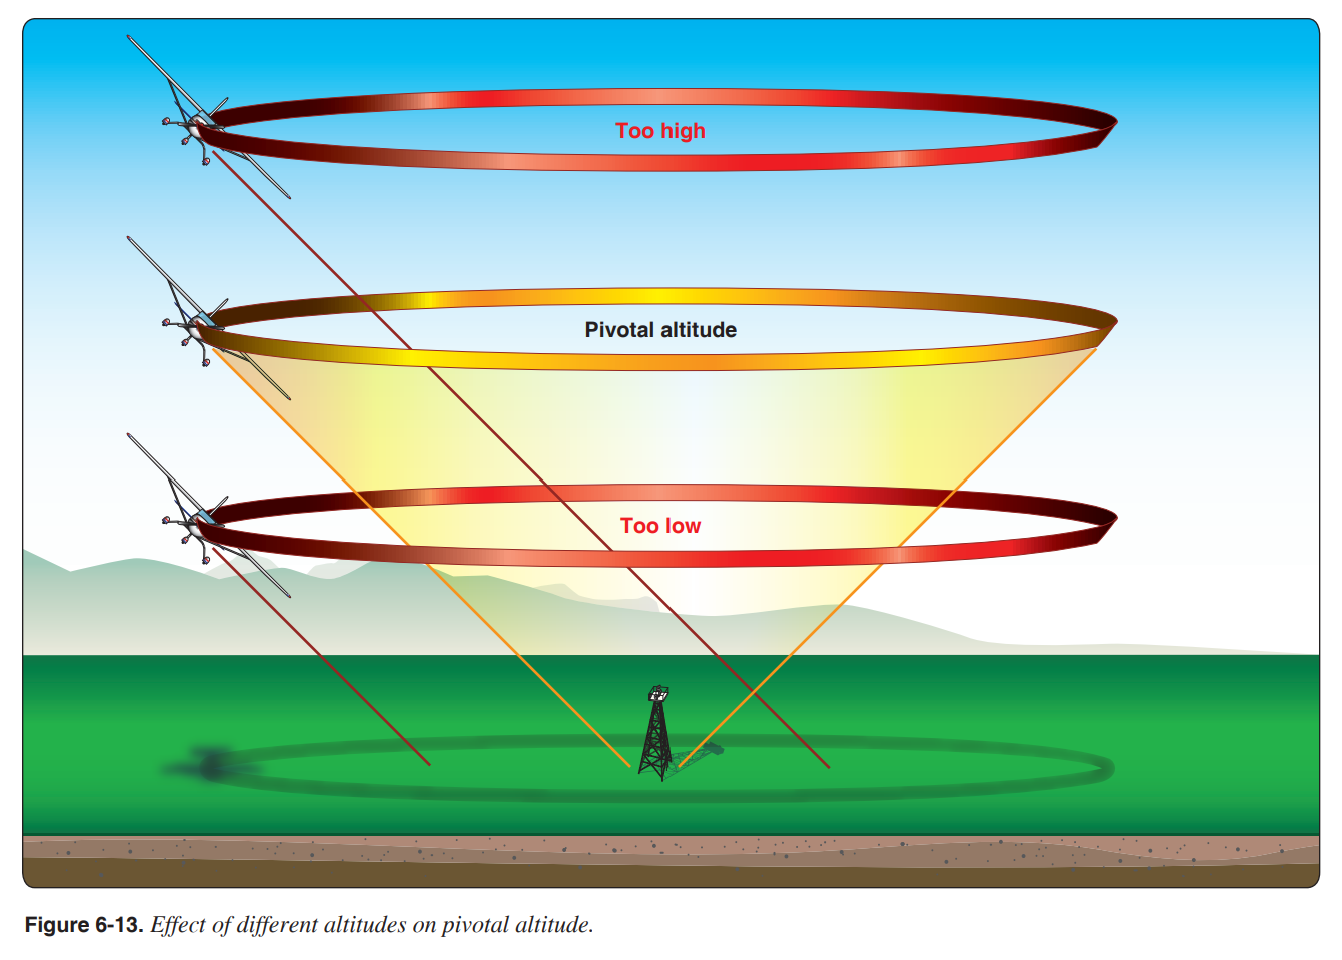
The key point regarding this maneuver is understanding the concept of a pivotal altitude. This is a specific altitude at which, when the aircraft turns at a given groundspeed, a projection of the sighting reference line to the selected point on the ground will appear to pivot on the point. The sighting reference is commonly just keeping the "pylon" in the same spot on the window. In an aircraft without a swept wing, this could also be a point along an imaginary line off of the wingtip.
When an aircraft is turning at the pivotal altitude the wingtip appears to be fixed to a single point in the landscape. However, when any other height other than the pivotal altitude is used the wing tip will appear to move across the landscape. If the height is greater than the pivotal altitude (a normal situation in flight, as the pivotal altitude is fairly low) the wingtip appears to move backward over the landscape. When the aircraft is turning at a height less than pivotal altitude the wingtip appears to move forward over the landscape. Thus, when a turning and descending aircraft descends below pivotal altitude there is an apparent reversal of the wingtip movement from backward to forward, which is why the pivotal altitude is sometimes called the reversal height.
The pivotal altitude is based on groundspeed. If the groundspeed is measured in knots the formula for the pivotal altitude is GS^2/11.3. If the groundspeed is measured in MPH the formula for pivotal altitude is GS^2/15. Since predicted groundspeed may be difficult to determine during preflight planning, and because the entry to the maneuver is generally performed with a crosswind, the planned TAS (found in the performance charts) can be used to provide an estimate for the pivotal altitude to start the maneuver. From there adjustments will have to be made to account for the actual groundspeed during the maneuver. Finally, the pivotal altitude does not change based on bank, only based on the groundspeed.
The initial pivotal altitude calculation is never going to be exact. Attempt to estimate both the highest (TAS + tailwind) and lowest (TAS - headwind) pivotal altitudes prior to the maneuver. Determine if the "window" described is safe under the current prevailing conditions.

Wind/Groundspeed Correction
Since the headings throughout the turns continually vary from directly downwind to directly upwind, the groundspeed will constantly change. This will result in the pivotal altitude changing throughout the maneuver. Adjustment is made by climbing or descending, as needed, to hold the reference line or point on the pylons.
As the groundspeed decreases (headwind) the wing appears to move backward with respect to the pylon, so descend to hold the reference line to the pylon. So if the point moves forward then apply forward pressure to capture the new pivotal altitude. As the groundspeed increases (tailwind) the wing appears to move forward with respect to the pylon, so climb to hold the reference line to the pylon. So if the point moves backward then apply back pressure to capture the new pivotal altitude.

It should be noted that as the pitch changes, airspeed will naturally change. Since pivotal altitude is based on groundspeed, a change in airspeed will also result in a change in groundspeed, thus a change in pivotal altitude (at least during the period of time that the airspeed is altered). Ultimately, however, the aircraft will return to level flight and thus to the originally trimmed airspeed so this impact is a transient one.
Pitch controls the sight picture to be maintained horizontally. Bank, on the other hand, controls the sight picture vertically. If the sight picture begins to move up the window (bank too steep) the bank will have to be decreased to maintain the line of sight reference. Conversely, if the sight picture begins to move down the window (bank too shallow) the bank will have to be increased to maintain the line of sight reference.
Corrections are based on wind speed, and if the wind speed is too great then the changes my become great enough to become unsafe. Strong winds may also blow the aircraft too close to the pylon requiring too great a bank to maintain the sight picture. The elevator is the primary control for holding the pylons. Do not attempt to use rudder pressure to hold the wingtip on the pylon.
Performing Eights on Pylons
Before Starting
-
First select a starting altitude
-
This should be the calculated pivotal altitude based on the TAS being near Va, the current estimated wind, and therefore the estimated entry groundspeed.
-
-
Perform the pre-maneuver checklist
-
Fuel Pump - ON
-
Mixture - RICH
-
Gauges - GREEN
-
-
Ensure that the area is clear of traffic
-
Flaps and gear (if retractable) should be in the UP position.
-
The aircraft should be in straight-and-level flight at a speed close to Va.
Entry
-
Select two suitable reference points or pylons
-
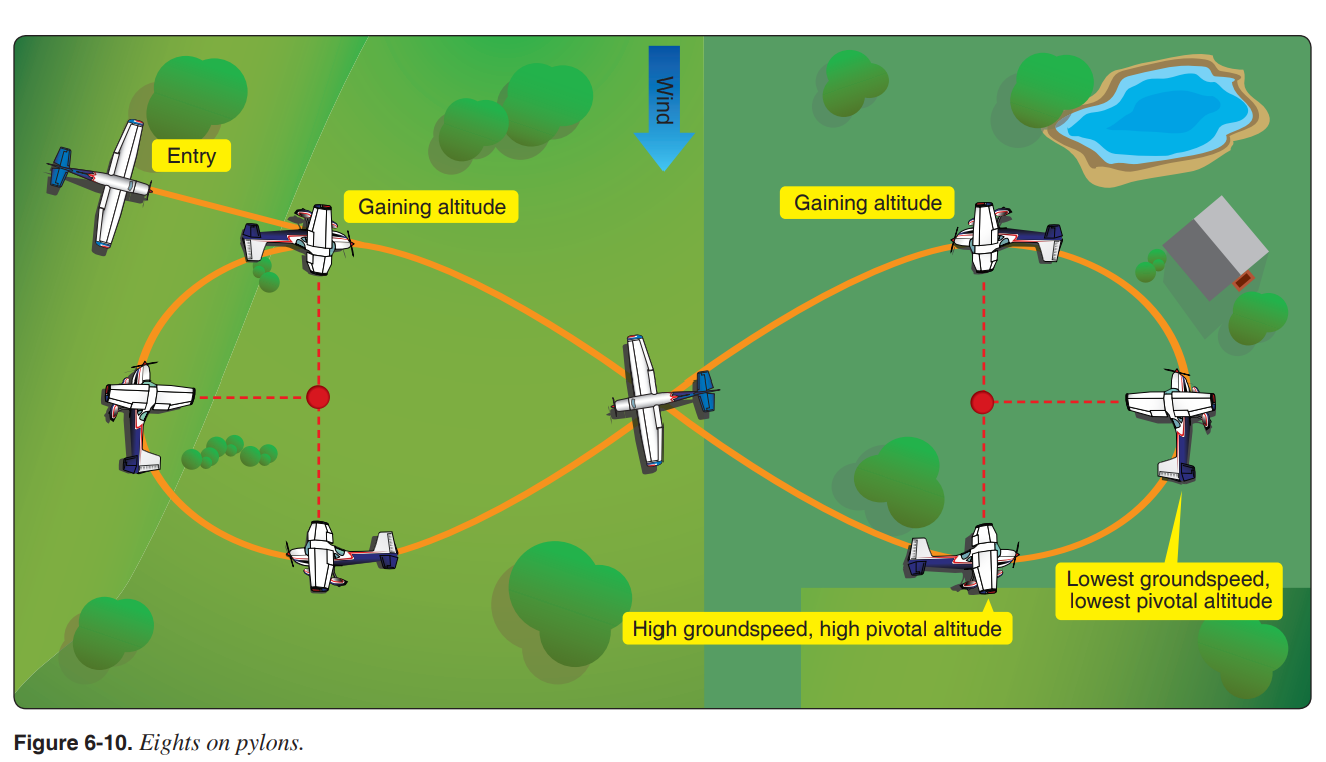
The pylons should be two points on the ground along a line which lies 90° (perpendicular) to the wind. They should be in an open area free of obstructions, sufficiently prominent to be readily seen when coming back for the maneuver, and also when completing the turn around one pylon and heading for the next. They should be adequately space to provide time for planning the turns and yet not cause unnecessary straight-and-level flight between the pylons. It is recommended they be separated by approximately 3 to 5 seconds straight-and-level flight between the points. Finally, the smaller the pylon the easier it is to notice changes in relative movement.
-
-
Enter the maneuver trimmed on airspeed and at the estimated pivotal altitude
-
Enter at a 45° angle to the (right of the) downwind in order to make the first turn to the left around the left pylon. The left turn is to put the pylon out the left window (easiest to see) rather than looking over the right seat passenger and through the right window. With a downwind entry the aircraft will have the highest speed, and the highest pivotal altitude.
-
Fly to the midpoint between the pylons, and note the entry heading as it will be the exit heading as well.
-
Maintain straight-and-level flight until the pylon is just ahead of the reference line, the roll into a 30° to 40° bank, not to exceed 40°
-
Place the wingtip on the pylon
Flying the Turns
-
Entry is at the highest groundspeed, and therefore the highest pivotal altitude
-
Continuing through the turn will be a turn into increasing headwind, and the groundspeed will get progressively lower. If no correction is made the wingtip will move back in reference to the pylon. Descend to maintain correct pivotal altitude.
-
-
As the turn continues the groundspeed is low, and therefore the turn is at the lowest pivotal altitude.
-
Continuing through the turn will be a turn into an increasing tailwind, and the groundspeed will get profressively higher. If not correction is made the wingtip will move forward in reference to the pylon. Climb to maintain correct pivotal altitude.
-
-
Each turn around a pylon progresses identically, with the only difference being the direction of turn.
Transitioning between Pylons
-
As the aircraft turns toward a downwind heading the rollout of the turn should be started, and the aircraft should proceed diagonally to a point on the downwind side of the second pylon.
-
Maintain straight-and-level for 3 to 5 seconds, crabbing into the wind to correct for wind drift
-
Initiate a turn in the opposite direction when the pylon is abeam the wing reference point
Exit
-
After completing one rotation around each pylon, roll wings level, and exit on the entry heading.
Common Errors
|
⚠️
|
|
Conclusion
Brief review of the main points
-
If the point moves forward, apply forward pressure
-
If the point moves backward, apply back pressure
Eights on Pylons is the most advanced and most difficult of the low altitude flight training maneuvers. Because of the various techniques involved, this maneuver is unsurpassed for teaching, developing, and testing subconscious control of the airplane.
ACS Requirements
CFI PTS Standards
- To determine that the applicant
-
-
Exhibits instructional knowledge of the elements of eights on pylons by describing:
-
The purpose of eights on pylons and their relationship to basic/advanced airmanship skills.
-
How to determine the approximate pivotal altitude.
-
How to select suitable pylons with consideration given to emergency landing areas.
-
Orientation, division of attention, and planning.
-
Configuration and airspeed prior to entry.
-
Relationship of groundspeed change to the performance of the maneuver.
-
Pilot’s “line-of-sight” reference to the pylon.
-
Entry procedure.
-
Procedure for maintaining “line-of-sight” on the pylon.
-
Proper planning for turn entries and rollouts.
-
How to correct for wind drift between pylons.
-
Coordination of flight controls.
-
-
Exhibits instructional knowledge of common errors related to eights on pylons by describing:
-
Faulty entry procedure
-
Poor planning, orientation, and division of attention.
-
Uncoordinated use of flight controls.
-
Use of an improper “line-of-sight” reference.
-
Application of rudder alone to maintain “line-of-sight” on the pylon.
-
Improper planning for turn entries and rollouts.
-
Improper correction for wind drift between pylons.
-
Selection of pylons where there is no suitable emergency landing area within gliding distance.
-
-
Demonstrates and simultaneously explains eights on pylons from an instructional standpoint.
-
Analyzes and corrects simulated common errors related to eights on pylons.
-
Commercial Pilot ACS Skills Standards
-
Clear the area.
-
Determine the approximate pivotal altitude.
-
Select suitable pylons that will permit straight-and-level flight between the pylons.
-
Correctly enter the maneuver at the appropriate altitude and airspeed.
-
Establish the correct bank angle for the conditions, not to exceed 40°.
-
Apply corrections so that the line-of-sight reference line remains on the pylon.
-
Divide attention between accurate, coordinated airplane control and outside visual references.
-
Maintain pylon position using appropriate pivotal altitude, avoiding slips and skids.